Helen | 7 Apr 2013

When we take over a website or an internet marketing campaign from another provider or from a client who’s been doing their own online marketing, one of the first things we do is review their Google Analytics. We’re looking to see:
- How much traffic do they get?
- Where does it come from; and
- How many enquiries or sales have they had as a result?
The last of those three items is where Google Analytics goals come in – and in the vast majority of cases, we find that the client does not currently have any goals set.
So, here’s a beginners’ guide to setting goals in Google Analytics.
This setup is suitable for those who have Administrator access to their Google Analytics account, and who want to track the number and source of any enquiries coming through their contact form. This is the most common type of setup and is appropriate for most websites with a contact form.
1. Identify your ‘goal page’
Your goal is to get visitors to arrive at the page after the contact form has been submitted – the page that says ‘thank you for your enquiry’.
This page should have a different address to the address of the page with the form on it. To find out what the address is, send yourself a test enquiry via your enquiry form. Copy the address of your ‘thank you’ page from the address bar. Make sure it is a different address to the address of the page with the form on it. Paste this address into a Notepad file for the moment.
 2. Set up your Goal in Analytics
Log into Google Analytics. In the top right hand corner above the date range you should see an ‘Admin’ button (pictured). Click on this button. This should take you to a screen where you can see a list of all the profiles within your account. You’ll probably just have the one, which will be labelled probably with the name of your website, or with something like ‘All website data’. Click on the name of the profile to go into the profile settings. You should now have a tab labelled ‘Goals’: 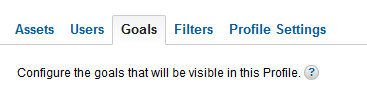 Click on the Goals tab, and you will see that you can have four different ‘sets’ of goals, each with 5 different goals in it. This is useful if you have lots of different types of Goals – for example, you might use one set of goals to track contact form submissions, and another set to track downloads of specific documents.
In this example, though, we’re assuming that you just want to track one contact form, to keep things simple. Click on ‘+Goal’ under Goal Set 1 and you will get the following options to configure your goal: 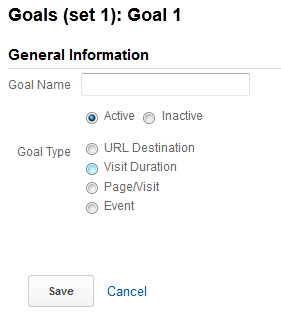 Give your goal a name, such as ‘Contact form completed’, for example. Leave ‘active’ selected and select ‘URL destination’ as the Goal Type. The following options will then open up:
 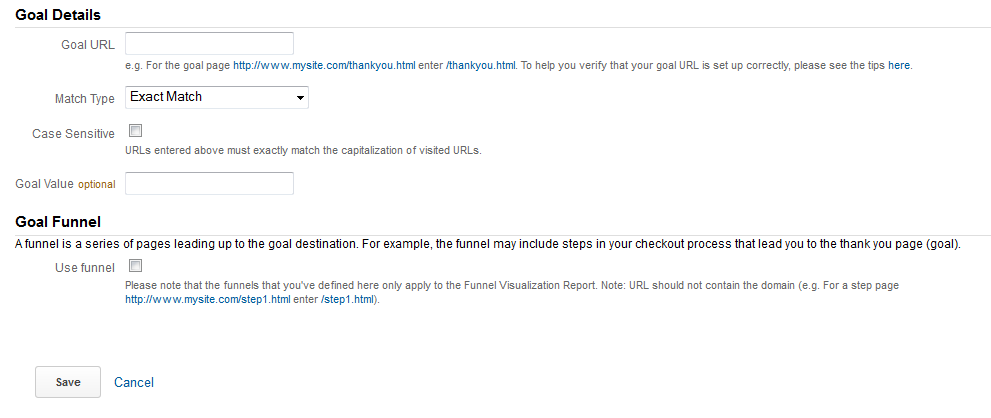 The address of your goal page – the one that you pasted into a Notepad file earlier – needs to go into the ‘Goal URL’ box. Strip off the first part of the address – your domain name – so that you are left with something like /thankyou.html. For a simple setup, you should be able to leave all the other options alone and just press ‘Save’ to finish the process. You’ve now set up your first goal!
3. View your goal data in Analytics
 Once you’ve set up your goal, you’ll get additional data in Google Analytics from now on. Note that the goal does not work retrospectively – so you won’t see any information about goals that were completed before setting the goal following the instructions above.
To make sure your goal is working, you might want to send yourself another contact form through, especially if you don’t get that many enquiries – otherwise you could be waiting days before you find out it isn’t working!
What should you see if it’s working correctly?
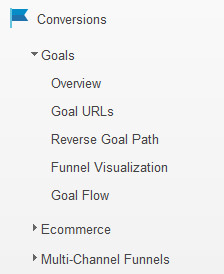
Go back into ‘Reporting’ and look at the ‘Conversions’ option on the menu bar. Select it and you should see a number of sub-options. Select ‘Goals’ and then ‘Overview’ and you should see a graph showing how many times your form has been submitted over the last 30 days (unless you’ve changed the date range to show a different date period). You should see data for ‘Goal Completions’ (the number of times the form was submitted), ‘Goal Conversion Rate’ (the percentage of visits that resulted in an enquiry), and, if you have more than one goal set, you will be able to see a breakdown of how many of each goal there were.
What’s even more useful, though, is that you can see goals in other Google Analytics reports. For example, go to Traffic Sources > Sources > Search > Organic, for example. Above the graph you should see the option to select ‘Goal Set 1’. Click on that option, and you can then see conversion rates for all your organic keywords! 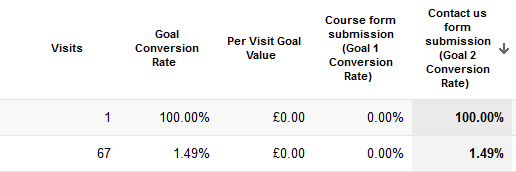 It’s as simple as that! There’s a lot more you can do with goals once you get started – but hopefully this blog post has given you the information you need to set up your first goal. Any questions? Post a comment below!
Tags:
More from Ascendancy
Mary | 5 Apr 2024
Always coffee in the mornings, then tea in the day. You can never go wrong with an Italian… until you have to pick whether you want pizza or pasta. But Italian is probably my favourite. I would…
John | 26 Mar 2024
For e-commerce stores, a shopping feed provides a revolutionary way to advertise your product catalogue online. Despite removing the limits of a physical storefront and enabling you to list thousands…
Madeline | 21 Mar 2024
Six months ago I started a Digital Marketing Assistant Apprenticeship, here at Ascendancy. To say that the time has flown by, would be an understatement! Although it is now hard to imagine life…